My daily commuter finally stolen, so here i am

OK so lets take this one at a time. Remember how I said the secondary housing cannot touch? Well, I think its touching from what I can see. Here look at the red arrows I put on one of your pics. that spot right there. The big round secondary housing can NOT touch the frame. It can be about a business card's width away from it and still be safe. Buf if its in contact thats a recipe for breaking the frame. In your case it might survive as its solid steel, although there is a cutout there.
PXL_20230425_003453099 (1).jpg


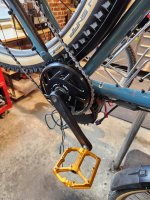
Here is a picture from one of my builds back in 2018. See how the black secondary housing is only a small distance away from the solid brace of the frame (open image in new window and zoom in)? Thats what you need. BTW you are seeing a Lekkie 42T chainring on that bike like the one you bought. More on that in a minute.

IMG_20180115_182537.jpg


If your builder couldn't push the motor in far enough because of secondary housing contact, that means the motor is not seated properly on the frame, and THAT means you can tighten this thing down all day long and it will never stop wobbling. Again, a basic mistake and one that - since this guy let it out of his shop like that - would make me very reticent to let them touch your bike again.

Remember I am saying all of this assuming that a problem I cannot see for sure is in fact whats happening here. A close look at that spot with the arrows, taken just like what I did in my pic above, would say for sure. Or just you go look. Take a business card and see if you can slide it between frame and motor. If no then problem.

So how do you fix that? Its not like it isn't a common issue to solve. Here is a pic of the standard way to do it, and I am showing you a MUCH bigger solution than you need for the sake of making it obvious:

IMG_20180517_184524.jpg

Look at the red arrow. See how there is a great big steel washer there? Look up at the chainstay root. See how its now just a bit away from the frame? Thats what you have to do. I put in the yellow arrow so you can see how the washer seats into the indentation on the motor... I am thinking your motor has a gap right there if the motor is in contact with the frame... the axle could not fit all the way down to the root.

the above is a custom metric bushing I had made for that bike, precise in width and oversized to give good purchase to the motor and the frame. It was about a $40 part and took about a month for McMaster-Carr to make it for me. How about something simpler for you?

Amazon sells this exact product, made for exactly this job. These ones are in 2.5mm lengths. Slip one or two of these over the axle before you fit it to the frame to space the thing out some. I had mine custom made because I needed something damn big for that fat bike and stacking up a bunch of thin spacers is a bad idea.


If you need more than two stacked up - and I doubt that - there are other options. But I am pretty sure you won't need more than a couple of them... and be advised when you first fit a couple of them on, the fitment will not be known for sure until you clamp the thing down as the motor will compress the fitment. Check for that business card's width AFTER tightening.
 
Links to Amazon may include affiliate code. If you click on an Amazon link and make a purchase, this forum may earn a small commission.
Next: You bought a Lekkie 42T chainring. In both the white and titanium bikes I pictured above, you can see the same Lekkie 42T chainring. Its a great product, but one of its strengths can also be an issue: It has an offset to move the chainline inboard towards your seat tube, so chain line is more like a bike with no motor on it.

But... what if you do not have the room to fit it because of that offset? You have already seen the potential for trouble with your steel Bafang ring almost being in contact with the chainstay root. Buying the Lekkie without doing some measurements on your bike might put you into the same boat. It may contact the frame. If it doesn't that will be wonderful. But if it does, That Deruiz chainring I linked above may be the solution. It looks like it has a bigger offset, but it has less. I know I measured it side by side with a Lekkie. If the Lekkie doesn't fit, you can try that next one.

Its also possible the Lekkie - if its a near thing - can be made to fit with a little 2mm spacer. This is the Lekkie chainring spacer. It goes between the chainring and the motor. I would not buy one until you know it will solve your problem, although they are only $6


Speaking of spacers, Cali Ebike has a bottom bracket spacer kit that has a 1mm, 2mm and 3mm spacer in it, instead of a stack of 2.5's like I linked above. I'd buy both just to get that 3mm spacer, and then use one of the 2.,5's, or a 2 or a 1mm to get just the right fit. You won't know what you need until you dig in and start working it.

 
Lastly, fit the bottom bracket spacers before you make any decisions about the chainring. The bottom bracket spacers will move the whole motor away from the frame, which will help decide whether the chainring is going to fit. If you get proper fitment on the motor, do NOT stack up extra spacers on the bottom bracket to get the chainring to fit. Use up to one and only one 2mm spacer under that ring. And remember that Lekkie can be used on any chainring in case you are really screwed and even the Deruiz does not fit without a spacer.

But I think its going to be fine. The Bafang rind is 46T and its much wider than the Lekkie. A 42T ring has more room to tuck in as a result, which is going to make things easier. Plus since you are moving the motor away from the frame your clearance is going to improve just from doing that.
 
OK one more last thing and I'm done until we hear back: I was looking at my how-to series and went over my Tinkering section. I had forgotten about how much detail I had put into this. There are many photos, including much better ones, describing the issues you have, and their solutions. I really went all out to try and make sure a reader has the tools to make sure this sort of thing gets diagnosed and dealt with on the first try. Maybe your mechanic could use a reference if they don't get what the problem is, and this is it.


In that post I also included an excellent video on frame fitment to supplement what I was saying in words and pics. It was produced by Cap Codswallop who is a well-respected and established member of the DIY community.
Hi m@Robertson. At first, much of your shared info was not really making sense to me, but it starting to make sense now. And I do not know what I was thinking when I ordered the Lekki chain ring, but if it ends up not fitting readily, I will return it and get the Deruiz 42T per your suggestion. So I have been sharing your knowledge via these posts with my builder. He really wants to make it right and said he will. I think by the time he is done with this bike, I think that I will have a killer daily commuter, and I think he will be a better e-bike builder. And again, it is you who is making both of these things possible.

As far as the plan. The mechanic/builder emailed me today, and said that the owner of the shop will drive the 20 miles to my house and pick up the bike this Friday. I do not know why, but I feel bad about that, but if it were me, I would offer to do the same thing. I may let them do that, but I also still may rent the uhaul and deliver to them on Saturday. At minimum, I will offer to get a uhal and deliver it to them. It would be costly to me at like $70, but I guess my thinking is that these guys at Giant of Bridgeport are all super good dudes. Like really good dudes. And while the builder messed up 1 or 2 key items, he has truly learned now, so it will all be good. And this shop and these guys have excellent google reviews, and they are small business owners, so for the owner to be out of the shop for like 1.5-2 hours, is something the shop could feel a little on a Friday. Anyway, no matter how the bike get to the shop, I will leave it there until the mechanic has made all the fixes mentioned here.

Regarding whether the motor housing is touching the frame, I went and looked at the bike again, and the motor is just so loose now, that if I move it into position, the housing is no longer touching the frame. So I do not think it was touching when the motor was tight, and in the proper place. Either way, the builder is now aware of this and will make sure the end product is not one where the housing is touching the frame.

The Lekki onenut arrives this Friday at the shop, so with a new chain ring, the onenut, and any needed spacers, we should be in good shape to finalize this bike. The builder also suggested the luna cycle's stabilizer bar, but I am hopeful with the onenut and the correct installation procedure, that the motor will be good to go without needing a stabilizer bar. In the about 14,000 miles and 4.5 years on my first ebike, I only needed the motor tightened twice, and the stabilizer bar is quite unsightly so I would rather not get it. I hope you agree with this, but I am open to anything here.

I really do not know how to thank you, but at minimum, if you ever come to Philly, I will take you and any family you may have with you, out for a some sightseeing in the city, and treat you to the best cheesesteaks, soft pretzels, and water-ice around!
 
@I_AM_VENNLIG I'm really glad to hear the above. I said what I did about screwups and mistakes in a bit of a vacuum, knowing nothing about the shop, their work ethic or their attention to detail. The truth is, sooo many people try to build a mid drive bike and they often miss out on key do's and don'ts. Building a hub-drive bike is pretty easy stuff. So long as you put on proper torque arms, there's not much to do and not much to go wrong. But building a mid drive really raises the bar in terms of stuff that has to be paid attention to. The good news is once you get those details nailed down, you end up with a genuinely trouble-free ride. One that is completely free of the kind of horror stories That Guy on the internet will spew out when they tell everyone how bad a mid drive is on reliability, chain life etc. etc.

If the motor was never touching, MAYBE what happened was he just didn't use a torque wrench and a dedicated Bafang ring socket to tighten the motor down. This is a VERY common mistake with one-off builders who use the little Bafang installation wrenches and try to tighten the motor by taking it down to what they think a good torque value is. Or they use a hammer on the wrench to try and get it tighter than their hands can make it. That makes me cringe but is probably not entirely ineffective, truth be told.

So a whole lot of them end up with a loosening motor and, consequently, you see all kinds of awful schemes to bolt that motor down, loctite the bejesus out of it or use some sort of supplementary bracket ... or even a strut drilled into the frame. It can all be solved by just using a proper socket to torque down the nut to the value specified (in the case of the Lekkie nut, at least).

As you probably know by now, I wrote up a much cheaper and fully effective way: Discard the outer lock ring and in its place use a second inner lock ring. The parkerized finish of the inner ring gives some friction, and the two rings together form a jam nut that doesn't loosen. Especially if you ignore the Bafang torque spec and overdo the torque. Luna Cycle used 100 ft lbs on their single-nut installations and I can confirm they are right it works... but instead if you do 90 ft lbs on two nuts it works just fine. I have bikes I built as far back as 2018 that have never budged.

And you can tell if its moving by using a Sharpie and making a registration mark. If the line across the nuts ever stops being a single straight line, you know its loosening up ... so you can tighten it back down long before it becomes an issue.
img_20200718_142311-e1622487480539[1].jpg


You and I have the same opinion about that stabilizer bar. It is an ugly kludge that is completely unnecessary if you do other things right. The Luna product is a copy of the one California Ebike sells. I own one of each and I have never found a bike they needed to be used on.

Your bike is however easily able to handle the dual hose clamp thing. I usually reserve that for bikes that jump off things. Its only necessary if you want to go hardcore, but I've done it myself a half dozen times with no ill effects. A $2 solution that will lock the motor down so firmly, even if you do not use the lock rings at all (don't do that :) ) it cannot move. The picture below is taken from the how-to Assembly article so the Tab A/Slot B stuff has meaning with the text there, along with more pics.
bbshd01[1].jpg


This one below was a test-fit on a 2wd Bullitt (which explains the PAS sensor on the axle for the second motor). That bike sees a lot of root-bumpy trails. The final-final fitment cleaned up the dumb-idea wire routing (I get stuff wrong too) and added a heat shrink sheath around the motor clamp like on the red one above. The lock ring looks loose because it is, as this was just a test. This bike is now my daily driver at home.

20230112_105624.jpg


Threatening me with cheesesteaks ... well everyone has their price and I can see that one maybe being mine :D


Keep us posted!
 

m@Robertson:​

This all makes a lot of sense, and I am very glad you said the stabilizer bar is not needed, assuming everything is properly installed. That is awesome to hear. So the owner of the bike shop pretty much insisted he will come pick up the bike in the morning. I feel bad as it is like a 20-22 mile ride for him, but he said they appreciate the trust I place in their shop, the business I have given them, and that it is kind of like a nice excuse for him to get breakfast or lunch somewhere in the city, as a nice break, so I offered to take him out for a meal. Long story short, we are meeting at 9am at a really awesome breakfast spot, I will treat to breakfast, and then he will pick up the bike from the garage just like 7-8 blocks away. I really am blessed to have such nice community both here in this forum, and in my real life biking community.

And once at the shop, the builder/bike mechanic will take it from there, and will refer to your directions, and make this amazing bike, one of the best ebikes ever put together. I am finally seeing a glimpse of light at the end of the tunnel, and I am just stoked. And i do have ton of faith in the builder, even with the hiccup we had. I have heard from 3 top shops that he is one of the best mechanics around, and the compliments have come from die hard cyclist and shop owners, so Harvey is tops in my book, and I totally excuse this glitch.

Thank goodness that the frame was not damaged, and thank goodness for you, m@Robertson. I will post updates as they become available, and will post the final verdict, once the bike is truly done.

Onward!!!

PS: I know the best cheesesteak place in Philly (John's Roast Pork), so come on over any time!!!
 
@I_AM_VENNLIG I'm really glad to hear the above. I said what I did about screwups and mistakes in a bit of a vacuum, knowing nothing about the shop, their work ethic or their attention to detail. The truth is, sooo many people try to build a mid drive bike and they often miss out on key do's and don'ts. Building a hub-drive bike is pretty easy stuff. So long as you put on proper torque arms, there's not much to do and not much to go wrong. But building a mid drive really raises the bar in terms of stuff that has to be paid attention to. The good news is once you get those details nailed down, you end up with a genuinely trouble-free ride. One that is completely free of the kind of horror stories That Guy on the internet will spew out when they tell everyone how bad a mid drive is on reliability, chain life etc. etc.

If the motor was never touching, MAYBE what happened was he just didn't use a torque wrench and a dedicated Bafang ring socket to tighten the motor down. This is a VERY common mistake with one-off builders who use the little Bafang installation wrenches and try to tighten the motor by taking it down to what they think a good torque value is. Or they use a hammer on the wrench to try and get it tighter than their hands can make it. That makes me cringe but is probably not entirely ineffective, truth be told.

So a whole lot of them end up with a loosening motor and, consequently, you see all kinds of awful schemes to bolt that motor down, loctite the bejesus out of it or use some sort of supplementary bracket ... or even a strut drilled into the frame. It can all be solved by just using a proper socket to torque down the nut to the value specified (in the case of the Lekkie nut, at least).

As you probably know by now, I wrote up a much cheaper and fully effective way: Discard the outer lock ring and in its place use a second inner lock ring. The parkerized finish of the inner ring gives some friction, and the two rings together form a jam nut that doesn't loosen. Especially if you ignore the Bafang torque spec and overdo the torque. Luna Cycle used 100 ft lbs on their single-nut installations and I can confirm they are right it works... but instead if you do 90 ft lbs on two nuts it works just fine. I have bikes I built as far back as 2018 that have never budged.

And you can tell if its moving by using a Sharpie and making a registration mark. If the line across the nuts ever stops being a single straight line, you know its loosening up ... so you can tighten it back down long before it becomes an issue.
View attachment 8648

You and I have the same opinion about that stabilizer bar. It is an ugly kludge that is completely unnecessary if you do other things right. The Luna product is a copy of the one California Ebike sells. I own one of each and I have never found a bike they needed to be used on.

Your bike is however easily able to handle the dual hose clamp thing. I usually reserve that for bikes that jump off things. Its only necessary if you want to go hardcore, but I've done it myself a half dozen times with no ill effects. A $2 solution that will lock the motor down so firmly, even if you do not use the lock rings at all (don't do that :) ) it cannot move. The picture below is taken from the how-to Assembly article so the Tab A/Slot B stuff has meaning with the text there, along with more pics.
View attachment 8649

This one below was a test-fit on a 2wd Bullitt (which explains the PAS sensor on the axle for the second motor). That bike sees a lot of root-bumpy trails. The final-final fitment cleaned up the dumb-idea wire routing (I get stuff wrong too) and added a heat shrink sheath around the motor clamp like on the red one above. The lock ring looks loose because it is, as this was just a test. This bike is now my daily driver at home.

View attachment 8650


Threatening me with cheesesteaks ... well everyone has their price and I can see that one maybe being mine :D


Keep us posted!


Hi @m@Robertson:​

So the shop owner and the bike builder drove an hour into the city on Friday morning to pick up the bike. We went out to a really nice breakfast too. Such nice community. Anyway, he has started working on it again, and reports that all is going well. Please see photos, and let me know what you think. I also ordered an EggRider V2 Bafang Bluetooth display, because it just looks nice and stealthy, and will take up less real estate on my handlebars than the DCP-18. And he is going to install these brakes that I ordered: Electric Bike Hydraulic Brake Set E-brake for Bafang Motor Power Cut Off...

I hope you approve of all of this, becasue clearly you know what you are doing. Regarding when this bike will be done, he thinks by thie coming Saturday. I will keep you updated.

Happy Sunday!
 

Attachments

  • 20230429_142716.jpg
    20230429_142716.jpg
    229.2 KB · Views: 107
  • 20230429_142739.jpg
    20230429_142739.jpg
    217.3 KB · Views: 108
  • 20230429_142918.jpg
    20230429_142918.jpg
    178.7 KB · Views: 102
  • 20230429_155851.jpg
    20230429_155851.jpg
    136.2 KB · Views: 105
  • 20230429_155856.jpg
    20230429_155856.jpg
    188.9 KB · Views: 98
Links to eBay may include affiliate code. If you click on an eBay link and make a purchase, this forum may earn a small commission.
3 business cards' thickness so yes thats a good sign. Did they have to shim it to get that spacing?

The OneNut is supposed to be used completely alone without an inner ring, but if you have full thread engagement with an inner and a OneNut, then I guess it can't hurt. See Lekkie's description here:


It sort of looks like the OneNut is sticking out past the end of the threads. As in not full engagement. Hopefully not but if it is, that needs to be fixed. Most likely by removing the inner lock ring. Then using a proper socket to torque the One Nut to the stated 50-60 Nm (the OneNut uses a standard Shimano bracket tool), and then finally to use the set screws to spread the outer ring and lock that torque in.

If it were me I would not use the Eggrider v2. If you hang around their Facebook user group, you will see here and there people with issues where the ER had problems, some even so bad as bricking the motor until the ER is removed in favor of a different display. Here's the thing: ER has to 'phone home' to register itself to the ER servers. At least initially and subsequently on occasion. If that login fails, bad things can happen. I actually have one myself but its for a Cyc X1 Pro and a custom controller. My ER v2 can no longer communicate properly for some reason and so I can't make any programming changes to that bike. I recently considered giving them another shot on my newest build but when I went back to the FB group and lurked, I saw people with similarly severe problems as they had two years prior. The ER seems like a product that has never really matured.

The Bafang SW102 mini display is identical externally to the ERv2. It does the same stealth job but it can only deliver 5 levels of PAS.
 
My neighbor and I removed the Bafang in my Giant Talon and replaced it with a Tongsheng. The Bafang didn't rub up against the chainstay. No need for spacers. The Tongsheng appeared to not hit the chainstay when we slid it thru the bottom bracket but it looked close. Told my neighbor maybe we need to install some spacers but he said no, there is enough space so I went with it. I look closer a few days later and I notice it is up against the chainstay. When tightening the bolts it must have pulled it toward and into the chainstay. I was disappointed because I tried the bike a few times and loved the torque sensing feel but knew until I get this fixed I shouldn't ride it. Been so busy had not had time to fix it until today. I figured once I install the spacer it will pull the motor out and the screw and the spacers where you screw the plate into the motor may not be enough.. So figured Home Depot may have some hardware I can use. After going to many HDs looking for different bolt links and metal spacers I got the right stuff. First installed one spacer (not for screws but the one to bring the motor away from the chainstay) it looked good and makes sens it was enough, but no tightened everything and it was against the chainstay. Had to take it apart again and had to add another spacer to separate the motor from chainstay. So now I have two spacers. The spacers to fit between the plate and motor aren't enough so have to go to two HDss until I find ones that work. Installed and now I have enough space.

Just riding it a short distance while it was up against the chainstay already caused a small indentation into the chainstay. I cann imagine over time the chainstay would have cracked if I didn't put spacers in.
 
I used these spacers for the bolts -


The manual says it uses #5 bolts 15mm length. After adding the long spacers I needed to get loner bolts so I got these and it fit like a charm -


When I bought the Bafang last year I bought these in case the motor needed spacers to prevent it from hitting the chainstay. Bought these in red. For the Tongsheng it came with spacers, unlike the Bafang. I used the stock spacers because I forgot I had the red ones. Red ones would look cooler but then again who would be looking at the spacers -


I also used some thread lock but generic, not LocTite
 
Links to Amazon may include affiliate code. If you click on an Amazon link and make a purchase, this forum may earn a small commission.
Ace Hardware outlets usually have the best selection of metric nuts, bolts, washers etc. Places like Home Depot I have given up on. If you want to find anything... the source is McMaster-Carr. The only drawback is what you pay for shipping but if you need something weird and they have it, its often worth it just to solve your problem.

Another really good place for esoteric hardware is Pegasus Auto Racing. Thats a seller I got to know when adding bits and pieces to a race car I used to play with. they sell hardened grade 8 airframe bolts there with tiny variations in thread length and bolt length for very precise jobs, and I used those for my extensions to do my double-decker aircraft carrier deck with a 40" longobard. The big spacers were from McMaster-Carr. Pegasus also has an excellent selection of large area washers in Grade 8 hardened steel that I have made good use of.

 
m@Robertson, thanks for the suggestions. I will check Ace next time. If Ace is a good source locally then I will go there. HD is just hit and miss. Fortunaetely after hitting enough HD stores I got what I needed but I rather go to one place such as Ace to get it. Maybe if I need to I will try those online places if Ace is out.
 
3 business cards' thickness so yes thats a good sign. Did they have to shim it to get that spacing?

The OneNut is supposed to be used completely alone without an inner ring, but if you have full thread engagement with an inner and a OneNut, then I guess it can't hurt. See Lekkie's description here:


It sort of looks like the OneNut is sticking out past the end of the threads. As in not full engagement. Hopefully not but if it is, that needs to be fixed. Most likely by removing the inner lock ring. Then using a proper socket to torque the One Nut to the stated 50-60 Nm (the OneNut uses a standard Shimano bracket tool), and then finally to use the set screws to spread the outer ring and lock that torque in.

If it were me I would not use the Eggrider v2. If you hang around their Facebook user group, you will see here and there people with issues where the ER had problems, some even so bad as bricking the motor until the ER is removed in favor of a different display. Here's the thing: ER has to 'phone home' to register itself to the ER servers. At least initially and subsequently on occasion. If that login fails, bad things can happen. I actually have one myself but its for a Cyc X1 Pro and a custom controller. My ER v2 can no longer communicate properly for some reason and so I can't make any programming changes to that bike. I recently considered giving them another shot on my newest build but when I went back to the FB group and lurked, I saw people with similarly severe problems as they had two years prior. The ER seems like a product that has never really matured.

The Bafang SW102 mini display is identical externally to the ERv2. It joes the same stealth job but it can only deliver 5 levels of PAS.
Hi. You sure are thorough. Your observation about the Lekkie onenut was right on. I shared that with the builder, and he replied "The OneNut in the photo is staged for show. Not actually installed yet." (He was just showing me what it would look like.)

And I really appreciate your suggestion about the Eggrider v2. Oh how I would love to have that unit along with the 9 levels of PA. On my first and only ever ebike, I had what sure seemed like a DCP-18, but was branded "Luna" and it only offered me 5 levels of PA. So while I lived with 5 only for the 4.5 years of riding that bike, I sure would like to have 9 available. There is part of me that is tempted to go with that one just because I would love a really stealthy display, and there is part of me that is tempted to still use the Eggrider on my new build, but it sounds like a bad idea. And it was just delivered from Luna to the builder's shop today! Ugh!! I imagine I will return it though.

And were you okay with the brake choice I got? (Electric Bike Hydraulic Brake Set E-brake for Bafang Motor Power Cut Off...) They will be delivered on Friday. Seems like I may have the bike this Saturday, but surely some time next week. Pics and further reports to come! Again, your knowledge has been so helpful here.

Best,
Greg
 
Links to eBay may include affiliate code. If you click on an eBay link and make a purchase, this forum may earn a small commission.
On my first and only ever ebike, I had what sure seemed like a DCP-18, but was branded "Luna" and it only offered me 5 levels of PA. So while I lived with 5 only for the 4.5 years of riding that bike, I sure would like to have 9 available.
Actually Luna sells real Bafang displays. They just buy so many Bafang private labels their name on it. Your 5-level DPC-18 is not Luna's fault. The DPC-18 used to have 9 levels (selectable to 5 or 3). For some reason Bafang changed it to a max of 5. Luna is along for the ride on that one. My personal display favorite is the Luna 860C which is actually in stock now on their site. It is of course just a Bafang 860C with a Luna label. Also Luna does stuff like make them work properly with 52v batteries, and gives you the advanced setup code so you can dig a little deeper than Bafang would ordinarily let you these days.

The reason I like the 860C (and I have actually replaced a couple of 9-level DPC-18s with 860C's because of this) is the 860C is brighter in blazing sunlight. It also has an option to display real time watts and amps together on the same screen. Its got a clock, too. First world problems, right?

There is part of me that is tempted to go with that one just because I would love a really stealthy display, and there is part of me that is tempted to still use the Eggrider on my new build, but it sounds like a bad idea. And it was just delivered from Luna to the builder's shop today! Ugh!! I imagine I will return it though.
Before you spend any more money, give it a try and see if its ok for you. Worst case you spend more money some time down the road rather than right now. Like I said I wouldn't but then again if I had one sitting there and was looking at blowing another hundred bucks to fix the problem, maybe I'd see if I could get lucky.

BTW mine has never broken but I hear they can if you hit them just wrong. Check this out:


that link doesn't work, but I was able to google the link text and find the brakes. They look pretty bare bones to me. I would think the brakes on the Marin would be a step up from that. Looking at the Marin web site you get Shimano 4-piston up front and 2-piston in back. Those ebay brakes are definitely a downgrade. I'd go with the magnet doohickies you already have if they work. Myself personally I use Magura MT5e's, which are more than double the price you paid and also require thicker rotors. But they are arguably the best ebike brake available. You also need either cutoff adapters or the special wiring harness Cali Ebike sells that wires directly into the Magura brakes. Quote a bit more money. I also use Tektro Type 17 2.2mm rotors, which are thicker still than the 2.0mm rotors Magura uses. Shimano rotors are IIRC 1.8mm which is industry standard. The Tektro rotors were originally made for downhill bikes and then Tektro wised up and started calling them ebike rotors. Their increased thickness makes them more warp resistant, gives more material to sink heat into and the dam things last forever since there's more material that has to wear down to the 1.8mm replacement thickness.
 
Links to eBay may include affiliate code. If you click on an eBay link and make a purchase, this forum may earn a small commission.
Actually Luna sells real Bafang displays. They just buy so many Bafang private labels their name on it. Your 5-level DPC-18 is not Luna's fault. The DPC-18 used to have 9 levels (selectable to 5 or 3). For some reason Bafang changed it to a max of 5. Luna is along for the ride on that one.
I see, and that makes sense. And after 4.5 years of e-biking, I really was fine with having 5 levels. It only bothered me in that I like to be able to have all options, but fact of the matter is that I was great with just 5.
My personal display favorite is the Luna 860C which is actually in stock now on their site. It is of course just a Bafang 860C with a Luna label. Also Luna does stuff like make them work properly with 52v batteries, and gives you the advanced setup code so you can dig a little deeper than Bafang would ordinarily let you these days.

The reason I like the 860C (and I have actually replaced a couple of 9-level DPC-18s with 860CX's because of this) is the 860C is brighter in blazing sunlight. It also has an option to display real time watts and amps together on the same screen. Its got a clock, too. First world problems, right?

Before you spend any more money, give it a try and see if its ok for you. Worst case you spend more money some time down the road rather than right now. Like I said I wouldn't but then again if I had one sitting there and was looking at blowing another hundred bucks to fix the problem, maybe I'd see if I could get lucky.

BTW mine has never broken but I hear they can if you hit them just wrong. Check this out:

I just checked out the 860C online. It's really nice, and I would prefer that to the DPC-18 that I bought for this build. And I like the DPC-18 enough, but now that you think it is okay to give the EggRider V2 a try, I will do that because I like that stealth factor. (And those protective cases are super cool looking, and seemingly even more functional.)

I might miss having a larger display at some point, but I can always go back to my DPC if I want or need to.

It looks like the ER v2 provides accurate info on a 52v battery, but I only found that on one website.

that link doesn't work, but I was able to google the link text and find the brakes. They look pretty bare bones to me. I would think the brakes on the Marin would be a step up from that. Looking at the Marin web site you get Shimano 4-piston up front and 2-piston in back. Those ebay brakes are definitely a downgrade. I'd go with the magnet doohickies you already have if they work. Myself personally I use Magura MT5e's, which are more than double the price you paid and also require thicker rotors. But they are arguably the best ebike brake available. You also need either cutoff adapters or the special wiring harness Cali Ebike sells that wires directly into the Magura brakes. Quote a bit more money. I also use Tektro Type 17 2.2mm rotors, which are thicker still than the 2.0mm rotors Magura uses. Shimano rotors are IIRC 1.8mm which is industry standard. The Tektro rotors were originally made for downhill bikes and then Tektro wised up and started calling them ebike rotors. Their increased thickness makes them more warp resistant, gives more material to sink heat into and the dam things last forever since there's more material that has to wear down to the 1.8mm replacement thickness.

You have an awesome and highly upgraded brake set up. And it is an upgrade in the safety department, so it is totally worth it. I just looked up the parts involved to see if I should pursue it, and unless I am missing something, it looks to be in the range of $600+ all in. I should consider it further, but at this point, I will use the ebay brakes for now I really dislike the magnet doohickies.

The build is very close to being dialed in now. I will keep the community posted.

Thanks
 
It does provide accurately on 52v.

I have one on a luna BBSHD build that i put the ludi V2 controller in with the offroad programming lol

I run a 52v 40ah battery in that one at thre moment. In Road settings i have everything turned down
but in offroad settings it is balls to the wall lol
Also if you really need to see some things just use your phone after paired with the ER2.
 
Mine reads 52v just fine as well.

And posting in this thread has gotten me thinking about the ERv2 and how it could help me solve a fitment issue on a bike I have. It may be the only practical solution. I don't want to do an SW102 (I actually have one in a box somewhere from an AliExpress kit I never used) because I don't want to deal with 5 levels of assist. I actually *need* 9. My first 4 settings are shared-use-path low power stuff, and 5-9 are the workhorse settings for hills of varying slope.

$600 on the brakes sounds crazy. Dunno where you are getting prices from but its too much unless those are the prices from your shop and maybe include install?

Roughly $150 per axle on these links. Note this is in German and I mention that because the term 'Schliesser' is in the product description. This is the version you want. In English that is 'Closer' and it is also sometimes shown as 'NO' or 'Normally Open'. The circuit is normally open, but the calipers close the circuit. Hence their being referred to as 'closers'. There is also a 'Normally Closed' version and you don't want those. These on Amazon are the full kit with the 2200mm cables already pre-filled and attached, although your shop will have to cut and re-bleed. I can get these for as low as $125 on EBay.

Magura is a German company so it is not unusual to see deals on them from German sellers. I have gotten MT5e's for $95 retail, or about the same from German bike shops as take-offs: taken off new bikes and put on Ebay, although deals like that are now gone post-Covid.


Next are the rotors. $23 each.


Lastly you want the Magura adapters to make them fit perfectly. Model QM45 in the front for a suspension fork post mount for a 180mm rotor. QM41 for a rear IS mount 180mm. Call it $20 each but you can do better I bet.

So $300+$46+$40=386 all in. Nothing to sneeze at but I've never regretted any of the ones I have installed.
 
Links to eBay may include affiliate code. If you click on an eBay link and make a purchase, this forum may earn a small commission.
Links to Amazon may include affiliate code. If you click on an Amazon link and make a purchase, this forum may earn a small commission.
Mine reads 52v just fine as well.

And posting in this thread has gotten me thinking about the ERv2 and how it could help me solve a fitment issue on a bike I have. It may be the only practical solution. I don't want to do an SW102 (I actually have one in a box somewhere from an AliExpress kit I never used) because I don't want to deal with 5 levels of assist. I actually *need* 9. My first 4 settings are shared-use-path low power stuff, and 5-9 are the workhorse settings for hills of varying slope.

$600 on the brakes sounds crazy. Dunno where you are getting prices from but its too much unless those are the prices from your shop and maybe include install?

Roughly $150 per axle on these links. Note this is in German and I mention that because the term 'Schliesser' is in the product description. This is the version you want. In English that is 'Closer' and it is also sometimes shown as 'NO' or 'Normally Open'. The circuit is normally open, but the calipers close the circuit. Hence their being referred to as 'closers'. There is also a 'Normally Closed' version and you don't want those. These on Amazon are the full kit with the 2200mm cables already pre-filled and attached, although your shop will have to cut and re-bleed. I can get these for as low as $125 on EBay.

Magura is a German company so it is not unusual to see deals on them from German sellers. I have gotten MT5e's for $95 retail, or about the same from German bike shops as take-offs: taken off new bikes and put on Ebay, although deals like that are now gone post-Covid.


Next are the rotors. $23 each.


Lastly you want the Magura adapters to make them fit perfectly. Model QM45 in the front for a suspension fork post mount for a 180mm rotor. QM41 for a rear IS mount 180mm. Call it $20 each but you can do better I bet.

So $300+$46+$40=386 all in. Nothing to sneeze at but I've never regretted any of the ones I have installed.
Thanks. I got the $600 from doing very rough math, and assuming that the rotors would have been more, and I factored in $75 for the install, but I have no idea if that is close or not. Either way, I totally agree that $368 is nothing to sneeze at, so I will give these ebay brakes a try since the shop will have them hopefully on Friday. Once they are, the builder says the bike is ready for pickup. Nice. And if these brakes give me any issue, I will take the $386 hit and go that route.

Really appreciate you sharing your knowledge. Cheers
 
Links to eBay may include affiliate code. If you click on an eBay link and make a purchase, this forum may earn a small commission.
Links to Amazon may include affiliate code. If you click on an Amazon link and make a purchase, this forum may earn a small commission.
Really appreciate you sharing your knowledge. Cheers
Glad to be able to help!

BTW (and don't go buying one cuz this is still an experiment) I purchased Bafang's follow-on to the SW102: The DM03. A display so new I know of no one who has actually used one. Supposedly this revision supports 3, 5 and 9 PAS levels, although I would not be at all surprised if it actually gives me 1, 3, 5, 7 and 9 (i.e. 5 selectable). I'm also unsure of how aggressive it is about enforcing a 48v system voltage limit. If past displays are an indicator, if there is a problem it will happen north of 57.8v (or 58.3v), which I may be fine with on a 2wd bike where my HD is only one dog on a team.

At US$40 it was a lot cheaper than trying an EggRider. I have a second complication with that display in that since I would have two of them, and they are different types (BAC 800 vs. Bafang) I will have activation issues based on what I have seen on the ER support group.
S92b18aef10d94736932d9fa8af60aa59A[1].jpg
 
Back
Top