Ratan fat Tire blew: Tire Liners install Rear wheel re-assembly issue - washer-bolt order

MT Krooner

New member
Local time
2:44 AM
Joined
Dec 20, 2022
Messages
8
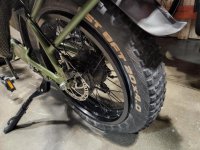
I took a picture before I took it off rear wheel to install the tire liners and new tube, but forgot to take a picture BEFORE lifting rear wheel out. I got the attached picture while it was still assembled, but only showed ONE-side re washer-bolt order. (attached)
SHOULD HAVE taken picture while Rattan ebike was UPSIDE DOWN showing how washers fit.
QUESTION: Do both go back on the same, or is one washer inside frame, and other outside the frame? (this worked best as far as rear wheel spinning free after putting it back on. But still have a slight "tightness"/drag to the wheel freely spinning.) When I put both sides on the same way (washer on outside of frame next to bolt) it seems even worse -- ie too tight and wheel spins even less free.
QUESTION2: can someone provide pictures (or take apart guide for changing tires) that show the bolt and washer placements?
 

Attachments

  • rattan rear wheel.jpg
    rattan rear wheel.jpg
    118.1 KB · Views: 99
The ones i've seen usually go on the inside.....
That being said, you'll need to be sure that some washers/spacers are in the right place...usually up against
the wheel bearing/wheel bearing cover if i recall correctly.
 
Thanks for the video, that was the one I was following (during the job). On the video he didn't show the tire BEFORE he lifted wheel out to see washer placements.
"need to be sure that some washers/spacers are in the right place...usually up against
the wheel bearing/wheel bearing cover if i recall correctly."
That is what I thought, since the weird/spacer washer needs to be on the inside of frame on other side of the photo above (since that is where a critical wire is). But the picture shows the spacer washer on OUTSIDE (above) on opposite side. Having them BOTH on inside doesn't seem to work either.
Was hoping someone has a RATTAN, gone thru this already, or could look to see how washers are arranged BEFORE tire is removed (on both sides).
 
This might show a bit more?


This video is on lectric, not on a Rattan. Different build/config on the rear tire spacer-washer and bolt combos. I combed all the videos I could on youtube for tire-liners, flats and rear wheels +Rattan...
But I msg'd @socialfilter, so thanks for that reference.
Ironically, I msgs Rattan directly, but their 'support' seems only interested in sales or warranties.
A simple take-apart manual would solve this problem. Just needs a few before and after pictures.

BTW: on the subject of TIRE LINERS, I found the Tannus liners AFTER I already installed the Mr. Tuffy ones. a TRICK I learned about Tannus is you have to step down the inner tube size if you use these liners. So one-size down (replacement tube) + Tannus liner for your tire size (Rattan is 20x4)
 
Links to Amazon may include affiliate code. If you click on an Amazon link and make a purchase, this forum may earn a small commission.
back-right-wheel-1.jpg
back-wheel-left2.jpg

Here's how it is currently (according to above RATTAN video). Wheel is very tight and doesn't spin well.
The way it seems "better", is to install one of the "weird"/spacer washers next to other washer on bolt side: ie one inside, one out.
But this doesn't seem logical. Putting both washers outside next to bolt is way too tight also.
 
View attachment 6932View attachment 6933
Here's how it is currently (according to above RATTAN video). Wheel is very tight and doesn't spin well.
The way it seems "better", is to install one of the "weird"/spacer washers next to other washer on bolt side: ie one inside, one out.
But this doesn't seem logical. Putting both washers outside next to bolt is way too tight also.
The picture on the right looks like the cassette is rubbing the frame..
Behind the weird washer on the picture on the right ..how many if any...washers do ya have on the axle into that void where
the cassette goes on there? I notice what appears to be metal shavings..that isn't good.
 
Thanks for that insight. That might have happened during a short test ride with the weird washers in and out (on either side). Must have been "out" on the cassette side (thus the rubbing). There may be a bigger issue with the drive-motor stuck "in gear" which is why it seems to "drag" instead of spin freely when the bike is upside down when I last put the back tire on in present (above) configuration. Going to go over and test it today (turned on, but just pedal while changing gears to see if things fall back into "normal"... or if there is a larger problem).

(edited Jan 5th) - WASHERS are now the way the should be according to video. Just went back over to try to figure out what else might be causing the rear wheel from spinning freely. Putting it in and out of gear, pedaling without any power assist, and then testing again with power assist... didn't seem to "losen" it up any. When the bike is off, back wheel still 'stiff' and doesn't spin freely (like before). I'm sort of at a loss what to do next. Isn't like I one can take it to a RATTAN dealer to get checked. ;) Suppose I'll have to call around to some local bike shops (who take-in and work on ebikes) and see what they think they might be able to do.
 
UPDATE: FIXED!! lesson learned the hard way by NOT watching videos all the way thru for correct bolt/nut/weird washer combination, which resulted in test ride that "pushed" brake pad to one side... causing the "friction/scraping" noise when I got it half-working.
Finally gave in and took it to a bike shop, and after couple tries we got brake pad moved to one side to open it up more and re-adjust brakes... so it works almost like it was after first blown tire repair. Got some sympathy and lessons from friendly guys who worked there for these e-bikes and their "close enough" replacement parts adventures. Nothing standard, or easy to match up without finding someone with experience. NOT looking forward to the day have up replace brake pads, or other wierd replacement parts that may need replacing one day, and are NOT available on RATTAN's site.
Once your Rattan arrives it's "Goodbye and Good Luck" from the company. You're left to try and figure out any issues by yourself or with the help from the friendly ppl on forums like this
 
Once your Rattan arrives it's "Goodbye and Good Luck" from the company. You're left to try and figure out any issues by yourself or with the help from the friendly ppl on forums like this
Yes, true. I wouldn't buy from Rattan again. Just happy to be mobile again. Been trouble-free since I put in the tire-liners and got the brake-scaping problem fixed. Next time will immediately invest in some better tires.
 
Yes, true. I wouldn't buy from Rattan again. Just happy to be mobile again. Been trouble-free since I put in the tire-liners and got the brake-scaping problem fixed. Next time will immediately invest in some better tires.
I've been checking out https://shinkotireusa.com/ once spring gets here I'm going to buy a pair of these and keep the factory ones as back ups
 
View attachment 6932View attachment 6933
Here's how it is currently (according to above RATTAN video). Wheel is very tight and doesn't spin well.
The way it seems "better", is to install one of the "weird"/spacer washers next to other washer on bolt side: ie one inside, one out.
But this doesn't seem logical. Putting both washers outside next to bolturn too tight also
I have a T-1 looks like your washers are upside down and your brake is draging. Lug down correctly aligns rotor and caliper. I recommend turn bike upside down like shown. Don't ever run bike with spacers like that axle will break free and spin damaging wire lead.
 
Back
Top