Ideas on how to fix this?

Smaug

Well-known member
Local time
11:46 AM
Joined
Jun 9, 2022
Messages
1,204
Location
SE Wisconsin
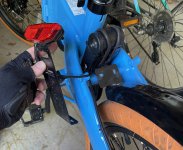
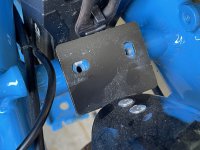
I seem to have stripped the holes for the rear light and fender on my Lectric XP Lite. (I must say that it didn’t take much at all)

I guess the thing to do is drill them out a bit and tap them for a bigger (and coarser!) thread? Then go easy on the tightening and use thread locker instead?

Any other ideas or is this the best way to go?
 

Attachments

  • IMG_3939.jpeg
    IMG_3939.jpeg
    232 KB · Views: 107
  • IMG_3940.jpeg
    IMG_3940.jpeg
    195.1 KB · Views: 107
Solution
I agree with the rivet nut recommendation. However, if it were my bike I would try going oversize by drilling and tapping to 1 milimeter for an oversized bolt. Fine thread gives better holding power. Even if it drills out the insert, you would need to do that before compressing a rivnut into the crossmember anyway.
After perseverating on it all day, I got ‘er done!

Came home and found that my dad’s old tap set is indeed imperial only and that the 1/4-20 tap is about worn out. There wasn’t enough room to turn the tap handle. I tried it with a small ignition wrench, but couldn’t push down hard enough with that. I wound up chucking it in my drill on low range, and that let me bear down. Lubed it with WD-40. Cleaned out the hole with a Q-tip and rubbing alcohol.

I did use blue Loctite; didn’t want to delay the project waiting for that fancy stuff M@ recommended.

The 1/4-20 bolts I had on hand have pan heads and a #3 Phillips head. That’s probably good, as I won’t over-torque it with a wrench.

While I had it apart, I used an angle grinder to grind that fender bracket down a bit, to allow clearance for the lock strap.

I think I will take Friday off and throw this bike in my car and take it to Road America to watch qualifying for the vintage car races.

Thanks for the advice, guys!

IMG_4104.jpeg
IMG_4105.jpeg
 
If it is only the thin wall of a pipe section that the thread is in, hard to tell from the pictures, get an appropriate size self tapping stainless steel and just force it in. That self tapped thread in aluminium will be just as strong, if not stronger, than a tread in a thin wall hollow section.
 
I just looked it up and the correct drill bit size for an M6 tap is 5 mm. 6.2 mm would be way too big:
I wasn't thinking of the tap size. Just a plain pass-thru hole. My bad. Apples/oranges. As you say, drilling the frame should always be the last resort.

My metric combo wrench sets don't have 18 mm, for some reason.
I had to buy 18mm and 19mm box end/crescent wrenches specially back when I began to work on Bafang hubs. Funny thing I was servicing my daughter and son-in-law's hub motor'd bikes... in Belgium no less. The land of metric. We went thru hell trying to find 18mm wrenches at all the local hardware stores in the suburbs surrounding Brussels... tons of places to shop and nobody had them. Since I went over on a plane I only brought the tools I thought I needed for doing the work planned (upgrading their brakes).
 
Assuming you're referring to my using 1/4-20 bolts, it looks like a #7 (13/64" = 0.203") is the correct size. (LINK)

1/4" would be too big and I'd have the problem of threads stripping easily again.

I wonder if that's what happened at Lectric in the first place?

I mostly meant a 1/4 inch drill would be fine if you want to drill through and use through bolts. you wouldn't use a 1/4 inch drill for tapping, no. (given the material, honestly, I'd probably use a #8 drill and a triflute hand tap and 1/4x24 but it depends on hos stripped out your hole is, if it's in round, etc. through drilling is a far better answer.)

I doubt drill size is really the problem with the factory doing the threading, though it's entirely possible the taps are worn or something, I just.. it's not good to put structural or more than 'finger tight" torque threads on aluminum unless it's over 6 or 8 threads. for M6x1 that's basically 7mm thick material.
 
After perseverating on it all day, I got ‘er done!

Came home and found that my dad’s old tap set is indeed imperial only and that the 1/4-20 tap is about worn out. There wasn’t enough room to turn the tap handle. I tried it with a small ignition wrench, but couldn’t push down hard enough with that. I wound up chucking it in my drill on low range, and that let me bear down. Lubed it with WD-40. Cleaned out the hole with a Q-tip and rubbing alcohol.

I did use blue Loctite; didn’t want to delay the project waiting for that fancy stuff M@ recommended.

The 1/4-20 bolts I had on hand have pan heads and a #3 Phillips head. That’s probably good, as I won’t over-torque it with a wrench.

While I had it apart, I used an angle grinder to grind that fender bracket down a bit, to allow clearance for the lock strap.

I think I will take Friday off and throw this bike in my car and take it to Road America to watch qualifying for the vintage car races.

Thanks for the advice, guys!

View attachment 9043View attachment 9044
OMG guys please stop using wd40 as lubricant. Especially for something like cutting threads.
 
OMG guys please stop using wd40 as lubricant. Especially for something like cutting threads.

Given WD40 is considered among professional machining forums to be the ideal lubricant for cutting threads in aluminium, perhaps you'd like to explain why these people are incorrect.
 
Because WD-40 is a water, dispersant agent, not a lubricant that’s what WD stands for.
That is often-repeated and technically correct, but it DOES lubricate temporarily. (which is what was needed here)

I once read a blog of a motorcyclist who used only WD-40 to lubricate his O-ring motorcycle chain. That chain lasted a LONG time; tens of thousands of miles. As long as if he had used a proper motorcycle chain lube or wax. Why? I'm guessing because the WD held off rust (water displacer) and since it mostly evaporates, didn't attract dirt, which would eventually damage the O-rings.

Also, it was on-hand and Tap Magic Aluminum was not. ;)

As the other fellow pointed out, I got the advice to use it from a machinist's forum. Good enough for me!
 
Hey, I was just reading the new posts. If you haven’t done the repair yet, be careful about bolting all the way through. To me the pic looks like it goes through a large diameter tube. There is a chance that when tightening up it will start to collapse the tube since there is no anti-compression collar inside for the bolt to go through. If you do repair it this way make sure you use nylock nuts because over time the tube may compress a little causing the nut to become loose and start rattling off.
 
Hey, I was just reading the new posts. If you haven’t done the repair yet, be careful about bolting all the way through. To me the pic looks like it goes through a large diameter tube. There is a chance that when tightening up it will start to collapse the tube since there is no anti-compression collar inside for the bolt to go through. If you do repair it this way make sure you use nylock nuts because over time the tube may compress a little causing the nut to become loose and start rattling off.
Good thinking. I wound up drilling out the hole and tapping it for 1/4-20. I used blue Loctite this time and took it easy on the tightening. (just snug with the #3 Phillips) It's not as many threads as athe 5 mm / 0.8 that it had before, but the threads are deeper and I think will hold better in aluminum than the fine threads it had before.

Also, on a separate topic, I'm waiting for that multi-voltage charger you recommended in another thread. I'm trying to keep the fleet between 20-80% now; should save me hundreds in batteries over the years. I'm debating buying a timer, as M@ suggested, just to be safe.
 
And if I am taking a ride later that day, I'll go to 100% so long as I unplug and ride right at about the time I hit 58.8v. The key thing being I don't let the bike sit at 100%. I'll walk out to the garage first thing in the morning and plug in, and by the time I am done getting ready I have added a volt or three.
 
Back
Top